DirectX 10 教程16:视锥剪裁
原文地址:Tutorial 16: Frustum Culling(http://www.rastertek.com/dx10tut16.html)。
源代码下载:dx10tut16.zip。
对象绘制其中的三维视场称之为视锥体,只有在视锥中的物体才会被显卡绘制到屏幕上,视锥体之外的物体会被显卡检测到并排除到绘制过程之外。
但借助于显卡进行剔除在场景很大时代价昂贵。例如,我们的场景拥有2000多个具有5000个多边形的模型,同一时间只有10至20个可见。显卡必须检测所有2000个模型的每个三角形,移除其中的1990个,而在屏幕上只绘制10个,这是非常没有效率的。
而视锥裁剪可以解决这个问题,它在绘制前就判断模型是否在视锥体之内,这可以避免发送所有的三角形到显卡处理,而只发送可见的三角形。我们将模型放置在一个立方体或一个长方体或一个球体中,只需计算这些几何体是否可见即可,背后的数学原理通常只需几行代码即可实现。
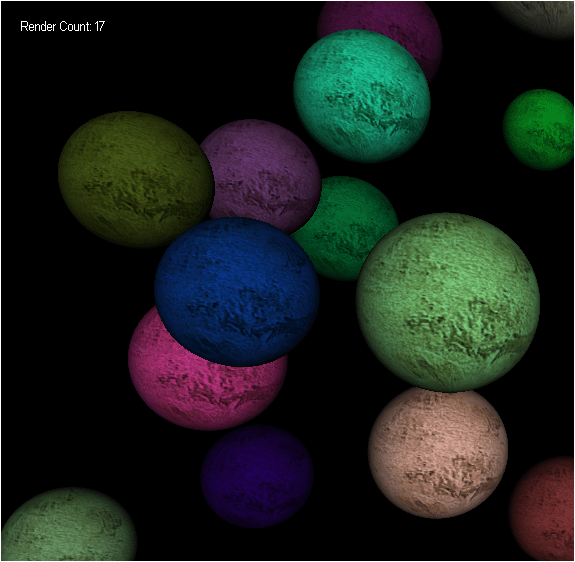
为了展示原理。我们首先在场景中创建了25个随机放置的球体,然后使用键盘上的左右键手动旋转相机测试剪裁效果,我们还使用了一个计数器显示绘制的球体数量。
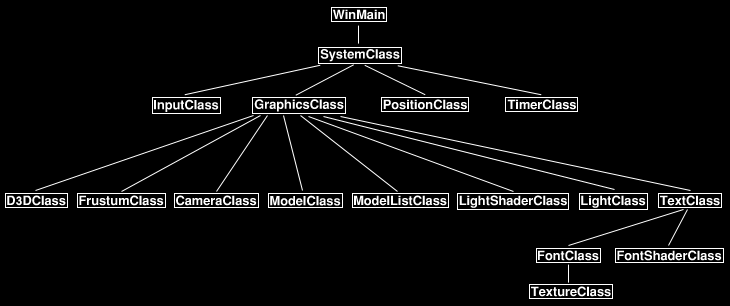
框架
框架中新添了三个新类:FrustumClass,PositionClass和ModelListClass。FrustumClass封装了视锥剪裁的功能,这也是本教程重点关注的内容。ModelListClass包含一个拥有25个随机位置和颜色的球体模型几何。PositionClass基于用户按下键盘左右键处理相机的旋转。
Frustumclass.h
FrustumClass的头文件很简单。这个类无需初始化或清除。每帧都会在相机更新后调用ConstructFrustum方法。ConstructFrustum方法使用私有变量m_planes计算并储存视锥体的六个面,我们可以调用任意4个方法检查一个点,立方体。球体或长方体是否在视锥体内。
////////////////////////////////////////////////////////////////////////////////
// Filename: frustumclass.h
////////////////////////////////////////////////////////////////////////////////
#ifndef _FRUSTUMCLASS_H_
#define _FRUSTUMCLASS_H_


//////////////
// INCLUDES //
//////////////
#include <d3dx10math.h>


////////////////////////////////////////////////////////////////////////////////
// Class name: FrustumClass
////////////////////////////////////////////////////////////////////////////////
class FrustumClass
{
public:
	FrustumClass();
	FrustumClass(const FrustumClass&);
	~FrustumClass();

	void ConstructFrustum(float, D3DXMATRIX, D3DXMATRIX);

	bool CheckPoint(float, float, float);
	bool CheckCube(float, float, float, float);
	bool CheckSphere(float, float, float, float);
	bool CheckRectangle(float, float, float, float, float, float);

private:
	D3DXPLANE m_planes[6];
};

#endif
Frustumclass.cpp
////////////////////////////////////////////////////////////////////////////////
// Filename: frustumclass.cpp
////////////////////////////////////////////////////////////////////////////////
#include "frustumclass.h"


FrustumClass::FrustumClass()
{
}


FrustumClass::FrustumClass(const FrustumClass& other)
{
}


FrustumClass::~FrustumClass()
{
}
ConstructFrustum每帧都由GraphicsClass调用,这个方法的参数为屏幕深度,投影矩阵和视矩阵,然后使用这些参数计算视锥体矩阵,由这个矩阵我们就可以计算构成视锥体的六个面。
void FrustumClass::ConstructFrustum(float screenDepth, D3DXMATRIX projectionMatrix, D3DXMATRIX viewMatrix)
{
	float zMinimum, r;
	D3DXMATRIX matrix;


	// Calculate the minimum Z distance in the frustum.
	zMinimum = -projectionMatrix._43 / projectionMatrix._33;
	r = screenDepth / (screenDepth - zMinimum);
	projectionMatrix._33 = r;
	projectionMatrix._43 = -r * zMinimum;

	// Create the frustum matrix from the view matrix and updated projection matrix.
	D3DXMatrixMultiply(&matrix, &viewMatrix, &projectionMatrix);

	// Calculate near plane of frustum.
	m_planes[0].a = matrix._14 + matrix._13;
	m_planes[0].b = matrix._24 + matrix._23;
	m_planes[0].c = matrix._34 + matrix._33;
	m_planes[0].d = matrix._44 + matrix._43;
	D3DXPlaneNormalize(&m_planes[0], &m_planes[0]);

	// Calculate far plane of frustum.
	m_planes[1].a = matrix._14 - matrix._13;
	m_planes[1].b = matrix._24 - matrix._23;
	m_planes[1].c = matrix._34 - matrix._33;
	m_planes[1].d = matrix._44 - matrix._43;
	D3DXPlaneNormalize(&m_planes[1], &m_planes[1]);

	// Calculate left plane of frustum.
	m_planes[2].a = matrix._14 + matrix._11;
	m_planes[2].b = matrix._24 + matrix._21;
	m_planes[2].c = matrix._34 + matrix._31;
	m_planes[2].d = matrix._44 + matrix._41;
	D3DXPlaneNormalize(&m_planes[2], &m_planes[2]);

	// Calculate right plane of frustum.
	m_planes[3].a = matrix._14 - matrix._11;
	m_planes[3].b = matrix._24 - matrix._21;
	m_planes[3].c = matrix._34 - matrix._31;
	m_planes[3].d = matrix._44 - matrix._41;
	D3DXPlaneNormalize(&m_planes[3], &m_planes[3]);

	// Calculate top plane of frustum.
	m_planes[4].a = matrix._14 - matrix._12;
	m_planes[4].b = matrix._24 - matrix._22;
	m_planes[4].c = matrix._34 - matrix._32;
	m_planes[4].d = matrix._44 - matrix._42;
	D3DXPlaneNormalize(&m_planes[4], &m_planes[4]);

	// Calculate bottom plane of frustum.
	m_planes[5].a = matrix._14 + matrix._12;
	m_planes[5].b = matrix._24 + matrix._22;
	m_planes[5].c = matrix._34 + matrix._32;
	m_planes[5].d = matrix._44 + matrix._42;
	D3DXPlaneNormalize(&m_planes[5], &m_planes[5]);

	return;
}
CheckPoint检测一个点是否在视锥体内。这是四种检测算法中最通用的一种,若使用的场合正确,也是最有效率的一种。这个方法的参数为点的位置,检查该点是否在六个面之内。如果该点在六个面之内则返回true,否则返回false。
bool FrustumClass::CheckPoint(float x, float y, float z)
{
	int i;


	// Check if the point is inside all six planes of the view frustum.
	for(i=0; i<6; i++)
	{
		if(D3DXPlaneDotCoord(&m_planes[i], &D3DXVECTOR3(x, y, z)) < 0.0f)
		{
			return false;
		}
	}

	return true;
}
CheckCube检测立方体的八个顶点是否在视锥体之内,这个方法的参数只需立方体中心点的位置和半径,然后检测任意一个顶点是否在视锥体的六个面之内,若没有返回true,否则返回false。
bool FrustumClass::CheckCube(float xCenter, float yCenter, float zCenter, float radius)
{
	int i;


	// Check if any one point of the cube is in the view frustum.
	for(i=0; i<6; i++)
	{
		if(D3DXPlaneDotCoord(&m_planes[i], &D3DXVECTOR3((xCenter - radius), (yCenter - radius), (zCenter - radius))) >= 0.0f)
		{
			continue;
		}

		if(D3DXPlaneDotCoord(&m_planes[i], &D3DXVECTOR3((xCenter + radius), (yCenter - radius), (zCenter - radius))) >= 0.0f)
		{
			continue;
		}

		if(D3DXPlaneDotCoord(&m_planes[i], &D3DXVECTOR3((xCenter - radius), (yCenter + radius), (zCenter - radius))) >= 0.0f)
		{
			continue;
		}

		if(D3DXPlaneDotCoord(&m_planes[i], &D3DXVECTOR3((xCenter + radius), (yCenter + radius), (zCenter - radius))) >= 0.0f)
		{
			continue;
		}

		if(D3DXPlaneDotCoord(&m_planes[i], &D3DXVECTOR3((xCenter - radius), (yCenter - radius), (zCenter + radius))) >= 0.0f)
		{
			continue;
		}

		if(D3DXPlaneDotCoord(&m_planes[i], &D3DXVECTOR3((xCenter + radius), (yCenter - radius), (zCenter + radius))) >= 0.0f)
		{
			continue;
		}

		if(D3DXPlaneDotCoord(&m_planes[i], &D3DXVECTOR3((xCenter - radius), (yCenter + radius), (zCenter + radius))) >= 0.0f)
		{
			continue;
		}

		if(D3DXPlaneDotCoord(&m_planes[i], &D3DXVECTOR3((xCenter + radius), (yCenter + radius), (zCenter + radius))) >= 0.0f)
		{
			continue;
		}

		return false;
	}

	return true;
}
CheckSphere检测球体是否在视锥体六个面之内,如果不是则球体不可见,这个方法会返回false,否则返回true表示球体可见。
bool FrustumClass::CheckSphere(float xCenter, float yCenter, float zCenter, float radius)
{
	int i;


	// Check if the radius of the sphere is inside the view frustum.
	for(i=0; i<6; i++)
	{
		if(D3DXPlaneDotCoord(&m_planes[i], &D3DXVECTOR3(xCenter, yCenter, zCenter)) < -radius)
		{
			return false;
		}
	}

	return true;
}
CheckRectangle工作原理与CheckCube相同,不同之处在于使用了长方体的x radius,y radius和z radius代替了立方体的单独一个radius。计算长方体的8个顶点和视锥检测的代码与CheckCube方法是类似的。
bool FrustumClass::CheckRectangle(float xCenter, float yCenter, float zCenter, float xSize, float ySize, float zSize)
{
	int i;


	// Check if any of the 6 planes of the rectangle are inside the view frustum.
	for(i=0; i<6; i++)
	{
		if(D3DXPlaneDotCoord(&m_planes[i], &D3DXVECTOR3((xCenter - xSize), (yCenter - ySize), (zCenter - zSize))) >= 0.0f)
		{
			continue;
		}

		if(D3DXPlaneDotCoord(&m_planes[i], &D3DXVECTOR3((xCenter + xSize), (yCenter - ySize), (zCenter - zSize))) >= 0.0f)
		{
			continue;
		}

		if(D3DXPlaneDotCoord(&m_planes[i], &D3DXVECTOR3((xCenter - xSize), (yCenter + ySize), (zCenter - zSize))) >= 0.0f)
		{
			continue;
		}

		if(D3DXPlaneDotCoord(&m_planes[i], &D3DXVECTOR3((xCenter - xSize), (yCenter - ySize), (zCenter + zSize))) >= 0.0f)
		{
			continue;
		}

		if(D3DXPlaneDotCoord(&m_planes[i], &D3DXVECTOR3((xCenter + xSize), (yCenter + ySize), (zCenter - zSize))) >= 0.0f)
		{
			continue;
		}

		if(D3DXPlaneDotCoord(&m_planes[i], &D3DXVECTOR3((xCenter + xSize), (yCenter - ySize), (zCenter + zSize))) >= 0.0f)
		{
			continue;
		}

		if(D3DXPlaneDotCoord(&m_planes[i], &D3DXVECTOR3((xCenter - xSize), (yCenter + ySize), (zCenter + zSize))) >= 0.0f)
		{
			continue;
		}

		if(D3DXPlaneDotCoord(&m_planes[i], &D3DXVECTOR3((xCenter + xSize), (yCenter + ySize), (zCenter + zSize))) >= 0.0f)
		{
			continue;
		}

		return false;
	}

	return true;
}
Modellistclass.h
ModelListClass用于保存场景中的所有模型的信息。本教程中它只保存球体模型的颜色和大小,因为本教程中使用的模型类型只有球体。这个类可以加以扩展保存不同种类的模型以及对应的ModelClass索引。
///////////////////////////////////////////////////////////////////////////////
// Filename: modellistclass.h
///////////////////////////////////////////////////////////////////////////////
#ifndef _MODELLISTCLASS_H_
#define _MODELLISTCLASS_H_


//////////////
// INCLUDES //
//////////////
#include <d3dx10math.h>
#include <stdlib.h>
#include <time.h>


///////////////////////////////////////////////////////////////////////////////
// Class name: ModelListClass
///////////////////////////////////////////////////////////////////////////////
class ModelListClass
{
private:
	struct ModelInfoType
	{
		D3DXVECTOR4 color;
		float positionX, positionY, positionZ;
	};

public:
	ModelListClass();
	ModelListClass(const ModelListClass&);
	~ModelListClass();

	bool Initialize(int);
	void Shutdown();

	int GetModelCount();
	void GetData(int, float&, float&, float&, D3DXVECTOR4&);

private:
	int m_modelCount;
	ModelInfoType* m_ModelInfoList;
};

#endif
Modellistclass.cpp
///////////////////////////////////////////////////////////////////////////////
// Filename: modellistclass.cpp
///////////////////////////////////////////////////////////////////////////////
#include "modellistclass.h"
构造函数中将模型信息集合初始化为null。
ModelListClass::ModelListClass()
{
	m_ModelInfoList = 0;
}


ModelListClass::ModelListClass(const ModelListClass& other)
{
}


ModelListClass::~ModelListClass()
{
}


bool ModelListClass::Initialize(int numModels)
{
	int i;
	float red, green, blue;
首先存储模型数量,然后创建ModelInfoType结构体数组。
	// Create a list array of the model information.
	m_ModelInfoList = new ModelInfoType[m_modelCount];
	if(!m_ModelInfoList)
	{
		return false;
	}
根据当前时间产生随机数,然后生成随机位置和颜色并储存在刚才创建的数组中。
	// Seed the random generator with the current time.
	srand((unsigned int)time(NULL));

	// Go through all the models and randomly generate the model color and position.
	for(i=0; i<m_modelCount; i++)
	{
		// Generate a random color for the model.
		red = (float)rand() / RAND_MAX;
		green = (float)rand() / RAND_MAX;
		blue = (float)rand() / RAND_MAX;

		m_ModelInfoList[i].color = D3DXVECTOR4(red, green, blue, 1.0f);

		// Generate a random position in front of the viewer for the mode.
		m_ModelInfoList[i].positionX = (((float)rand()-(float)rand())/RAND_MAX) * 10.0f;
		m_ModelInfoList[i].positionY = (((float)rand()-(float)rand())/RAND_MAX) * 10.0f;
		m_ModelInfoList[i].positionZ = ((((float)rand()-(float)rand())/RAND_MAX) * 10.0f) + 5.0f;
	}

	return true;
}
Shutdown方法释放模型信息集合数组。
void ModelListClass::Shutdown()
{
	// Release the model information list.
	if(m_ModelInfoList)
	{
		delete [] m_ModelInfoList;
		m_ModelInfoList = 0;
	}

	return;
}
GetModelCount返回模型数量。
int ModelListClass::GetModelCount()
{
	return m_modelCount;
}
GetData方法根据输入的索引获取球模型的位置和颜色。
void ModelListClass::GetData(int index, float& positionX, float& positionY, float& positionZ, D3DXVECTOR4& color)
{
	positionX = m_ModelInfoList[index].positionX;
	positionY = m_ModelInfoList[index].positionY;
	positionZ = m_ModelInfoList[index].positionZ;

	color = m_ModelInfoList[index].color;

	return;
}
Graphicsclass.h
////////////////////////////////////////////////////////////////////////////////
// Filename: graphicsclass.h
////////////////////////////////////////////////////////////////////////////////
#ifndef _GRAPHICSCLASS_H_
#define _GRAPHICSCLASS_H_


/////////////
// GLOBALS //
/////////////
const bool FULL_SCREEN = true;
const bool VSYNC_ENABLED = true;
const float SCREEN_DEPTH = 1000.0f;
const float SCREEN_NEAR = 0.1f;
本教程的GraphicsClass还包含新的frustumclass.h 和modellistclass.h。
///////////////////////
// MY CLASS INCLUDES //
///////////////////////
#include "d3dclass.h"
#include "cameraclass.h"
#include "textclass.h"
#include "modelclass.h"
#include "lightshaderclass.h"
#include "lightclass.h"
#include "modellistclass.h"
#include "frustumclass.h"


////////////////////////////////////////////////////////////////////////////////
// Class name: GraphicsClass
////////////////////////////////////////////////////////////////////////////////
class GraphicsClass
{
public:
	GraphicsClass();
	GraphicsClass(const GraphicsClass&);
	~GraphicsClass();

	bool Initialize(int, int, HWND);
	void Shutdown();
	bool Frame(float);
	bool Render();

private:
m_Frustum和m_ModelList为新添加的私有对象。
	D3DClass* m_D3D;
	CameraClass* m_Camera;
	TextClass* m_Text;
	ModelClass* m_Model;
	LightShaderClass* m_LightShader;
	LightClass* m_Light;
	ModelListClass* m_ModelList;
	FrustumClass* m_Frustum;
};

#endif
Graphicsclass.cpp
下面的代码只包含与上一个教程不同的部分。
////////////////////////////////////////////////////////////////////////////////
// Filename: graphicsclass.cpp
////////////////////////////////////////////////////////////////////////////////
#include "graphicsclass.h"
构造函数中将私有变量初始化为null。
GraphicsClass::GraphicsClass()
{
	m_D3D = 0;
	m_Camera = 0;
	m_Text = 0;
	m_Model = 0;
	m_LightShader = 0;
	m_Light = 0;
	m_ModelList = 0;
	m_Frustum = 0;
}


GraphicsClass::GraphicsClass(const GraphicsClass& other)
{
}


GraphicsClass::~GraphicsClass()
{
}


bool GraphicsClass::Initialize(int screenWidth, int screenHeight, HWND hwnd)
{
	bool result;
	D3DXMATRIX baseViewMatrix;


	// Create the Direct3D object.
	m_D3D = new D3DClass;
	if(!m_D3D)
	{
		return false;
	}

	// Initialize the Direct3D object.
	result = m_D3D->Initialize(screenWidth, screenHeight, VSYNC_ENABLED, hwnd, FULL_SCREEN, SCREEN_DEPTH, SCREEN_NEAR);
	if(!result)
	{
		MessageBox(hwnd, L"Could not initialize Direct3D.", L"Error", MB_OK);
		return false;
	}

	// Create the camera object.
	m_Camera = new CameraClass;
	if(!m_Camera)
	{
		return false;
	}

	// Initialize a base view matrix with the camera for 2D user interface rendering.
	m_Camera->SetPosition(0.0f, 0.0f, -1.0f);
	m_Camera->Render();
	m_Camera->GetViewMatrix(baseViewMatrix);

	// Create the text object.
	m_Text = new TextClass;
	if(!m_Text)
	{
		return false;
	}

	// Initialize the text object.
	result = m_Text->Initialize(m_D3D->GetDevice(), hwnd, screenWidth, screenHeight, baseViewMatrix);
	if(!result)
	{
		MessageBox(hwnd, L"Could not initialize the text object.", L"Error", MB_OK);
		return false;
	}

	// Create the model object.
	m_Model = new ModelClass;
	if(!m_Model)
	{
		return false;
	}
本教程使用的是球体模型而不是前面教程中的立方体模型。
	// Initialize the model object.
	result = m_Model->Initialize(m_D3D->GetDevice(), L"../Engine/data/seafloor.dds", "../Engine/data/sphere.txt");
	if(!result)
	{
		MessageBox(hwnd, L"Could not initialize the model object.", L"Error", MB_OK);
		return false;
	}

	// Create the light shader object.
	m_LightShader = new LightShaderClass;
	if(!m_LightShader)
	{
		return false;
	}

	// Initialize the light shader object.
	result = m_LightShader->Initialize(m_D3D->GetDevice(), hwnd);
	if(!result)
	{
		MessageBox(hwnd, L"Could not initialize the light shader object.", L"Error", MB_OK);
		return false;
	}

	// Create the light object.
	m_Light = new LightClass;
	if(!m_Light)
	{
		return false;
	}

	// Initialize the light object.
	m_Light->SetDirection(0.0f, 0.0f, 1.0f);
下面的代码创建一个新ModelListClass对象,创建了25个随机颜色和位置的球体模型。
	// Create the model list object.
	m_ModelList = new ModelListClass;
	if(!m_ModelList)
	{
		return false;
	}

	// Initialize the model list object.
	result = m_ModelList->Initialize(25);
	if(!result)
	{
		MessageBox(hwnd, L"Could not initialize the model list object.", L"Error", MB_OK);
		return false;
	}
下面的代码创建FrustumClass对象,因为每帧调用ConstructFrustum,所以它无需初始化。
	// Create the frustum object.
	m_Frustum = new FrustumClass;
	if(!m_Frustum)
	{
		return false;
	}

	return true;
}


void GraphicsClass::Shutdown()
{
在Shutdown方法中释放FrustumClass和ModelListClass对象。
	// Release the frustum object.
	if(m_Frustum)
	{
		delete m_Frustum;
		m_Frustum = 0;
	}

	// Release the model list object.
	if(m_ModelList)
	{
		m_ModelList->Shutdown();
		delete m_ModelList;
		m_ModelList = 0;
	}

	// Release the light object.
	if(m_Light)
	{
		delete m_Light;
		m_Light = 0;
	}

	// Release the light shader object.
	if(m_LightShader)
	{
		m_LightShader->Shutdown();
		delete m_LightShader;
		m_LightShader = 0;
	}

	// Release the model object.
	if(m_Model)
	{
		m_Model->Shutdown();
		delete m_Model;
		m_Model = 0;
	}

	// Release the text object.
	if(m_Text)
	{
		m_Text->Shutdown();
		delete m_Text;
		m_Text = 0;
	}

	// Release the camera object.
	if(m_Camera)
	{
		delete m_Camera;
		m_Camera = 0;
	}

	// Release the Direct3D object.
	if(m_D3D)
	{
		m_D3D->Shutdown();
		delete m_D3D;
		m_D3D = 0;
	}

	return;
}
Frame方法的参数为相机的旋转值,然后设置相机的位置和旋转,这样在Render方法中才能正确地更新视矩阵。
bool GraphicsClass::Frame(float rotationY)
{
	// Set the position of the camera.
	m_Camera->SetPosition(0.0f, 0.0f, -10.0f);

	// Set the rotation of the camera.
	m_Camera->SetRotation(0.0f, rotationY, 0.0f);

	return true;
}


bool GraphicsClass::Render()
{
	D3DXMATRIX worldMatrix, viewMatrix, projectionMatrix, orthoMatrix;
	int modelCount, renderCount, index;
	float positionX, positionY, positionZ, radius;
	D3DXVECTOR4 color;
	bool renderModel, result;


	// Clear the buffers to begin the scene.
	m_D3D->BeginScene(0.0f, 0.0f, 0.0f, 1.0f);

	// Generate the view matrix based on the camera's position.
	m_Camera->Render();

	// Get the world, view, projection, and ortho matrices from the camera and d3d objects.
	m_D3D->GetWorldMatrix(worldMatrix);
	m_Camera->GetViewMatrix(viewMatrix);
	m_D3D->GetProjectionMatrix(projectionMatrix);
	m_D3D->GetOrthoMatrix(orthoMatrix);
Render方法中最主要的变化在于我们现在每帧都需要根据视矩阵构建视锥体,视矩阵发生变化时都需要进行这个构建操作,否则视锥剪裁是不正确的。
	// Construct the frustum.
	m_Frustum->ConstructFrustum(SCREEN_DEPTH, projectionMatrix, viewMatrix);

	// Get the number of models that will be rendered.
	modelCount = m_ModelList->GetModelCount();

	// Initialize the count of models that have been rendered.
	renderCount = 0;
现在遍历ModelListClass对象中的所有模型。
// Go through all the models and render them only if they can be seen by the camera view.
	for(index=0; index<modelCount; index++)
	{
		// Get the position and color of the sphere model at this index.
		m_ModelList->GetData(index, positionX, positionY, positionZ, color);

		// Set the radius of the sphere to 1.0 since this is already known.
		radius = 1.0f;
下面的代码使用了FrustumClass对象。我们首先检查球体是否在视锥体内,如果是则进行绘制,如果不是则不绘制这个球体并检查下一个。
		// Check if the sphere model is in the view frustum.
		renderModel = m_Frustum->CheckSphere(positionX, positionY, positionZ, radius);

		// If it can be seen then render it, if not skip this model and check the next sphere.
		if(renderModel)
		{
			// Move the model to the location it should be rendered at.
			D3DXMatrixTranslation(&worldMatrix, positionX, positionY, positionZ);

			// Put the model vertex and index buffers on the graphics pipeline to prepare them for drawing.
			m_Model->Render(m_D3D->GetDevice());

			// Render the model using the light shader.
			m_LightShader->Render(m_D3D->GetDevice(), m_Model->GetIndexCount(), worldMatrix, viewMatrix, projectionMatrix,
								  m_Model->GetTexture(), m_Light->GetDirection(), color);

			// Reset to the original world matrix.
			m_D3D->GetWorldMatrix(worldMatrix);

			// Since this model was rendered then increase the count for this frame.
			renderCount++;
		}
	}
我们使用了稍加修改的TextClass显示实际绘制的球体数量。
	// Set the number of models that was actually rendered this frame.
	result = m_Text->SetRenderCount(renderCount);
	if(!result)
	{
		return false;
	}

	// Turn off the Z buffer to begin all 2D rendering.
	m_D3D->TurnZBufferOff();

	// Render the text string of the render count.
	m_Text->Render(m_D3D->GetDevice(), worldMatrix, orthoMatrix);

	// Turn the Z buffer back on now that all 2D rendering has completed.
	m_D3D->TurnZBufferOn();

	// Present the rendered scene to the screen.
	m_D3D->EndScene();

	return true;
}
Positionclass.h
为了能够使用键盘控制相机的旋转,本教程我们创建了一个新类计算并保存相机的位置。这个类只处理左右旋转,但是可以加以扩展实现更多的功能,本教程的旋转还包含了加速和减速实现了相机的平滑旋转。
////////////////////////////////////////////////////////////////////////////////
// Filename: positionclass.h
////////////////////////////////////////////////////////////////////////////////
#ifndef _POSITIONCLASS_H_
#define _POSITIONCLASS_H_


//////////////
// INCLUDES //
//////////////
#include <math.h>


////////////////////////////////////////////////////////////////////////////////
// Class name: PositionClass
////////////////////////////////////////////////////////////////////////////////
class PositionClass
{
public:
	PositionClass();
	PositionClass(const PositionClass&);
	~PositionClass();

	void SetFrameTime(float);
	void GetRotation(float&);

	void TurnLeft(bool);
	void TurnRight(bool);

private:
	float m_frameTime;
	float m_rotationY;
	float m_leftTurnSpeed, m_rightTurnSpeed;
};

#endif
Positionclass.cpp
////////////////////////////////////////////////////////////////////////////////
// Filename: positionclass.cpp
////////////////////////////////////////////////////////////////////////////////
#include "positionclass.h"
在构造函数中将私有变量设置为null。
PositionClass::PositionClass()
{
	m_frameTime = 0.0f;
	m_rotationY = 0.0f;
	m_leftTurnSpeed  = 0.0f;
	m_rightTurnSpeed = 0.0f;
}


PositionClass::PositionClass(const PositionClass& other)
{
}


PositionClass::~PositionClass()
{
}
SetFrameTime方法用来设置帧速度。PositionClass使用这个帧速度计算相机旋转的速度。这个方法需要在每帧一开始时调用。
void PositionClass::SetFrameTime(float time)
{
	m_frameTime = time;
	return;
}
GetRotation返回相机绕Y轴的旋转量,本教程中我们只需这个辅助方法,你可以很容易地加以扩展,例如获取相机的位置。
void PositionClass::GetRotation(float& y)
{
	y = m_rotationY;
	return;
}
旋转方法工作原理相同,且都在每帧被调用。输入参数keydown表示用户是否按下了键盘的向左或向右键。如果按下了按键则每帧旋转速度都会增加一点直至最大值,通过这个方法,相机的旋转效果就好像一辆加速的车辆一样,达到了一种平滑且反应迅速的效果。同理,如果用户释放了按键,则keydown为false,每帧会减少一点旋转速度直至变为零。旋转速度是基于frame time计算的,这样能确保在不同的帧频下旋转速度都能保持不变。最后使用了一些基本的数学计算了相机的新位置。
void PositionClass::TurnLeft(bool keydown)
{
	// If the key is pressed increase the speed at which the camera turns left.  If not slow down the turn speed.
	if(keydown)
	{
		m_leftTurnSpeed += m_frameTime * 0.01f;

		if(m_leftTurnSpeed > (m_frameTime * 0.15f))
		{
			m_leftTurnSpeed = m_frameTime * 0.15f;
		}
	}
	else
	{
		m_leftTurnSpeed -= m_frameTime* 0.005f;

		if(m_leftTurnSpeed < 0.0f)
		{
			m_leftTurnSpeed = 0.0f;
		}
	}

	// Update the rotation using the turning speed.
	m_rotationY -= m_leftTurnSpeed;
	if(m_rotationY < 0.0f)
	{
		m_rotationY += 360.0f;
	}

	return;
}


void PositionClass::TurnRight(bool keydown)
{
	// If the key is pressed increase the speed at which the camera turns right.  If not slow down the turn speed.
	if(keydown)
	{
		m_rightTurnSpeed += m_frameTime * 0.01f;

		if(m_rightTurnSpeed > (m_frameTime * 0.15f))
		{
			m_rightTurnSpeed = m_frameTime * 0.15f;
		}
	}
	else
	{
		m_rightTurnSpeed -= m_frameTime* 0.005f;

		if(m_rightTurnSpeed < 0.0f)
		{
			m_rightTurnSpeed = 0.0f;
		}
	}

	// Update the rotation using the turning speed.
	m_rotationY += m_rightTurnSpeed;
	if(m_rotationY > 360.0f)
	{
		m_rotationY -= 360.0f;
	}

	return;
}
Systemclass.h
SystemClass中包含了新的PostionClass。
////////////////////////////////////////////////////////////////////////////////
// Filename: systemclass.h
////////////////////////////////////////////////////////////////////////////////
#ifndef _SYSTEMCLASS_H_
#define _SYSTEMCLASS_H_


///////////////////////////////
// PRE-PROCESSING DIRECTIVES //
///////////////////////////////
#define WIN32_LEAN_AND_MEAN


//////////////
// INCLUDES //
//////////////
#include <windows.h>


///////////////////////
// MY CLASS INCLUDES //
///////////////////////
#include "inputclass.h"
#include "graphicsclass.h"
#include "timerclass.h"
#include "positionclass.h"


////////////////////////////////////////////////////////////////////////////////
// Class name: SystemClass
////////////////////////////////////////////////////////////////////////////////
class SystemClass
{
public:
	SystemClass();
	SystemClass(const SystemClass&);
	~SystemClass();

	bool Initialize();
	void Shutdown();
	void Run();

	LRESULT CALLBACK MessageHandler(HWND, UINT, WPARAM, LPARAM);

private:
	bool Frame();
	void InitializeWindows(int&, int&);
	void ShutdownWindows();

private:
	LPCWSTR m_applicationName;
	HINSTANCE m_hinstance;
	HWND m_hwnd;

	InputClass* m_Input;
	GraphicsClass* m_Graphics;
	TimerClass* m_Timer;
	PositionClass* m_Position;
};


/////////////////////////
// FUNCTION PROTOTYPES //
/////////////////////////
static LRESULT CALLBACK WndProc(HWND, UINT, WPARAM, LPARAM);


/////////////
// GLOBALS //
/////////////
static SystemClass* ApplicationHandle = 0;


#endif
Systemclass.cpp
下面的代码只包含与上一个教程中不同的部分。
////////////////////////////////////////////////////////////////////////////////
// Filename: systemclass.cpp
////////////////////////////////////////////////////////////////////////////////
#include "systemclass.h"


SystemClass::SystemClass()
{
	m_Input = 0;
	m_Graphics = 0;
	m_Timer = 0;
在构造函数中将PositionClass对象初始化为null。
	m_Position = 0;
}


SystemClass::SystemClass(const SystemClass& other)
{
}


SystemClass::~SystemClass()
{
}


bool SystemClass::Initialize()
{
	int screenWidth, screenHeight;
	bool result;


	// Initialize the width and height of the screen to zero before sending the variables into the function.
	screenWidth = 0;
	screenHeight = 0;

	// Initialize the windows api.
	InitializeWindows(screenWidth, screenHeight);

	// Create the input object.  This object will be used to handle reading the keyboard input from the user.
	m_Input = new InputClass;
	if(!m_Input)
	{
		return false;
	}

	// Initialize the input object.
	result = m_Input->Initialize(m_hinstance, m_hwnd, screenWidth, screenHeight);
	if(!result)
	{
		MessageBox(m_hwnd, L"Could not initialize the input object.", L"Error", MB_OK);
		return false;
	}

	// Create the graphics object.  This object will handle rendering all the graphics for this application.
	m_Graphics = new GraphicsClass;
	if(!m_Graphics)
	{
		return false;
	}

	// Initialize the graphics object.
	result = m_Graphics->Initialize(screenWidth, screenHeight, m_hwnd);
	if(!result)
	{
		return false;
	}

	// Create the timer object.
	m_Timer = new TimerClass;
	if(!m_Timer)
	{
		return false;
	}

	// Initialize the timer object.
	result = m_Timer->Initialize();
	if(!result)
	{
		MessageBox(m_hwnd, L"Could not initialize the Timer object.", L"Error", MB_OK);
		return false;
	}
下面的代码创建PositionClass对象,它无需初始化。
	// Create the position object.
	m_Position = new PositionClass;
	if(!m_Position)
	{
		return false;
	}

	return true;
}


void SystemClass::Shutdown()
{
PositionClass对象在Shutdown方法中释放。
	// Release the position object.
	if(m_Position)
	{
		delete m_Position;
		m_Position = 0;
	}

	// Release the timer object.
	if(m_Timer)
	{
		delete m_Timer;
		m_Timer = 0;
	}

	// Release the graphics object.
	if(m_Graphics)
	{
		m_Graphics->Shutdown();
		delete m_Graphics;
		m_Graphics = 0;
	}

	// Release the input object.
	if(m_Input)
	{
		m_Input->Shutdown();
		delete m_Input;
		m_Input = 0;
	}

	// Shutdown the window.
	ShutdownWindows();

	return;
}

bool SystemClass::Frame()
{
	bool keyDown, result;
	float rotationY;


	// Update the system stats.
	m_Timer->Frame();

	// Do the input frame processing.
	result = m_Input->Frame();
	if(!result)
	{
		return false;
	}
每帧中PositionClass对象都要基于时间进行更新。
	// Set the frame time for calculating the updated position.
	m_Position->SetFrameTime(m_Timer->GetTime());
之后PositionClass中的两个旋转方法会根据键盘状态进行更新,并进一步计算出相机的新旋转值。
// Check if the left or right arrow key has been pressed, if so rotate the camera accordingly.
	keyDown = m_Input->IsLeftArrowPressed();
	m_Position->TurnLeft(keyDown);

	keyDown = m_Input->IsRightArrowPressed();
	m_Position->TurnRight(keyDown);
获取相机的新旋转值后,将它发送到Graphics::Frame方法更新相机位置。
// Get the current view point rotation.
	m_Position->GetRotation(rotationY);

	// Do the frame processing for the graphics object.
	result = m_Graphics->Frame(rotationY);
	if(!result)
	{
		return false;
	}

	// Finally render the graphics to the screen.
	result = m_Graphics->Render();
	if(!result)
	{
		return false;
	}

	return true;
}
总结
现在你已经学习了如何剪裁物体,关键在于使用一个立方体、或一个长方体、或一个球体、或更聪明地使用一个点剪裁不同类型的物体。
练习
1.编译程序并允许,使用键盘向左或向右键移动相机,更新左上角显示的绘制数量。
2.使用立方体模型代替球体模型,对应的检测方法也应变为CheckCube。
3.创建不同类型的模型,尝试用最好的方法进行视锥体检测。
文件下载(已下载 1236 次)发布时间:2012/8/1 下午11:44:34 阅读次数:8795
